All in One View
Content from Making a toy dataset
Last updated on 2025-02-25 | Edit this page
Overview
Questions
- What do we mean by testing in the context of workflows?
- What makes a suitable dataset for testing?
- How do we go about designing tests?
Objectives
- Learn about unit tests, integration tests and regression tests
- Review the example assembly workflow
- Create a toy dataset to test the workflow
Publishing and sharing your workflows
In this and the following episodes, we’ll look at the requirements and considerations to make your workflow into a re-usable resource that you can publish and share. If all you want is to archive your code and get a DOI for publication then you may find that some of this is overkill, but if you envision your workflow being actively used in future then the time invested to follow these steps will be well worth it.
We will start with the assembly workflow from episode 12 of the introductory lessons. We will take this workflow and imagine this is something that we are looking to publish. If you have your own working solution you may want to work with that, but for demonstration purposes we will use the standard sample answer.
In this first episode, we’ll consider how and why to make a toy dataset for our workflow.
Integration testing and regression testing
We are starting with a working workflow, so it may seem strange that we are now talking about testing it, but we want to assure ourselves that it will behave when set to work on a new analysis task or in a new computing environment.
Quick quiz
What things might stop a Snakefile from running if it was copied over to a new system or given new data?
A workflow may depend on:
- Details of the input data format or file naming
- Specific software packages, including Snakemake itself
- Features of a particular operating system
- Filesystem paths or local databases being available
- Network resources or internet access
- Additional files that are outside of the Snakefile
- Features or capacity of the hardware being used
…and probably more.
A software test consists of some sample input data, a command to run, and an expected result. The test may run through the whole workflow, which would be termed an integration test, or you could make individual tests that run specific rules in the workflow and these would be called unit tests. Either approach is valid here. Such tests can be re-run at any time to check that the whole workflow is operational. When setting up the workflow on a new system, this provides reassurance that everything is working before any attempt to analyse real data.
Further, if you modify your workflow in future, or want to use updated versions of tools, you want to be sure that your changes do not cause a new bug in something that already worked. Such bugs in code are called regression, and regression tests aim to show them up. In practise, both unit tests and integration tests can be effective regression tests as long as you have an easy way to go back and re-run them.
A test suite is a collection of unit tests and/or integration tests that can be run quickly, ideally with a single command. For this simple workflow, our “suite” can be an integration test that runs the whole workflow on a toy dataset.
What is a toy dataset?
A toy dataset is a small sample dataset that can be used to run the pipeline. You may want to include other test datasets with your pipeline, but having one which is as small as possible has many uses.
- The small “toy” files can be stored alongside the code, eg. in GitHub.
- The whole pipeline can be run very quickly even on a small computer, to check that all the tools, conda envs, containers, etc. are behaving themselves.
- In Snakemake, you can use the toy dataset as a basis for generating a sample DAG (ie. a diagram to represent your workflow).
- Even a small FASTQ file nowadays is too large for a human to read, but a user or developer should be able to directly examine the toy dataset and the intermediate and final results on their screen.
- If you developed the pipeline on your own research data, this may not be freely redistributable. The toy dataset should be open data, or at least as redistributable as the pipeline itself.
A strategy for making a toy dataset
We’re working with RNA reads in FASTQ files, so an obvious idea is to down-sample these files to, say, a couple of hundred reads. However, these reads are going to be from different parts of the yeast transcriptome and are not going to assemble together. We could map reads back to the draft assembly and look to extract an assembly-friendly set, but in practise it’s easier to go back to the transcriptome and make up some synthetic reads.
In this code, zcat deals with uncompressing the gzipped
data, grep is selecting just the FASTA header lines, and
this reveals that there are…
6612 transcripts in our yeast transcriptome. Let’s take the first five.
BASH
$ zcat transcriptome/Saccharomyces_cerevisiae.R64-1-1.cdna.all.fa.gz | \
   fasta_formatter | \
   head -n 10 > first5.fa
In the code above, the fasta_formatter is part of the
standard fastx_toolkit (the same set of tools that includes
fastx_trimmer) and this joins the sequences onto a single
line each, meaning that the first ten lines, as saved from the
head command, contain the first five transcripts.
We will now use wgsim, a simple short read simulator. It
can be installed standalone but is normally packaged with
samtools.
BASH
$ wgsim -e0.01 -d50 -N120 -175 -275 first5.fa toy_1_1.fq toy_1_2.fq
$ wgsim -e0.01 -d50 -N120 -175 -275 first5.fa toy_2_1.fq toy_2_2.fq
With the above commands, we generate a total of 240 read pairs
(-N120) with a read length of 75 (-175 -275).
The -d parameter sets the virtual fragment length and the
-e0.01 add a few errors in the reads. We can confirm that
these reads do assemble (to some extent) with velvet.
BASH
$ velveth velvet_toy 21 -shortPaired -fastq -separate \
    toy_1_1.fq toy_1_2.fq \
    toy_2_1.fq toy_2_2.fq
$ velvetg velvet_toy
$ tail velvet_toy/contigs.fa
The exact result will vary since there are random variables in both
the wgsim read generation and the velveth
graph construction, but you should expect to see around 60 contigs. By
no means a good assembly, but this is not the point. The longest contig
is a few hundred bases and this is enough. It may be biological
nonsense, but now have a suitable toy dataset for our workflow.
Let’s put these into a test directory.
$ mkdir -p tests/integration/toy_reads
$ mv -v toy_*.fq tests/integration/toy_readsComing to a toy dataset through trial and error
Finding the right flags to wgsim to make the commands
above took a mixture of guesswork and trial and error. Different options
were tried and Velvet was repeatedly re-run to see the result. There is
no correct answer here, we just need something that works, and as the
commands run in a matter of seconds the tinkering process can be pretty
quick.
We can also see in the wgsim log messages that one of the transcripts is too short to use, so we are actually simulating reads from just four sequences. If we were really sequencing such short fragments on a physical sequencer then the read pairs would overlap and we might even sequence right through the whole fragment into the adapter. wgsim cannot simulate this so it just skips the short sequence.
Making the integration test
These toy reads will be the basis of our automated tests.
Running the toy dataset
Starting with the original working answer, adapt the assembler Snakefile so that it processes these toy reads and assembles them with the four different k-mer length settings.
What did you need to change?
Assuming you started with the sample answer, three changes are needed:
- The
CONDITIONSlist needs to change to just["toy"] - In the
cutadaptrule, theinputdirectory needs to change fromreadstotests/integration/toy_reads. - In the
concatenaterule, theinputlists need to be shortened from three to two items.
It’s easiest to decide if a test has passed or failed if the expected output is identical every time, but that might not be the case here as the assemblies can vary a bit. If we can’t guarantee identical output, we can at least make some stipulations for the test run to be judged successful.
Challenge
Which of these should always be true for our toy dataset? Which would be most reasonable to check?
- There will always be a contig longer than 300bp
- There will always be a contig longer than 500bp
- The max contig with k21 will be longer than with k25
- There will always be exactly 313 contigs in total, over all output files
- There will be over 50 contigs in every output file
Finally, we can look to automate the tests. This version just checks
that the assem/toy_k19_max_contig.txt file has a number
over 300. We’ll save this into a file named
tests/integration/run.sh.
BASH
#!/bin/bash

snakemake -F --use-conda -j1
max_len=$( egrep -o '[0-9]+$' assem/toy_k19_max_contig.txt )
if [[ "$max_len"  > 300 ]] ; then echo PASS ; else echo FAIL ; fi
The fist line marks this out as a shell script. After running
snakemake, the egrep -o ... command is used to get
just the number from the file, the max_len=$( ... ) syntax
captures that number into a shell variable named max len,
and we can use internal shell arithmetic to check the number is >300,
finally printing PASS or FAIL.
And we can run the test in the terminal:
It’s simple, and it can be improved, but it works. Our workflow has an integration test.
Content from Separating code and configuration
Last updated on 2025-02-25 | Edit this page
Overview
Questions
- What needs to be configurable in our workflow?
- How do we express these settings using the Snakemake config mechanism?
- How does this fit in with testing?
Objectives
- Separate the code of our workflow from the configuration
- Have a single workflow that runs on our original and test data
Making a configurable workflow
In the last episode, we edited the assembly workflow to run on the toy dataset. This involved editing the Snakefile directly so we now have two versions of the Snakefile. We want to separate the code from the configuration, and have a single Snakefile that assembles either the original reads, or the toy reads, or any other reads, according to the config settings.
We have already learned about the use of the --config
and --configfile options to Snakemake, and we will now
rearrange our workflow and configuration into three files:
-
Snakefilewhich will have all the rules -
yeast_config.yamlwhich will assemble the original test reads -
toy_config.yamlwhich will assemble the toy reads
Remember the three changes we had to make to the Snakefile (or use
the Linux diff command to remind you what changed).
BASH
$ diff  sample_answer.Snakefile Snakefile
3c3
< CONDITIONS = ["ref", "etoh60", "temp33"]
---
> CONDITIONS = ["toy"]
16,17c16,17
<         read1 = "reads/{sample}_1.fq",
<         read2 = "reads/{sample}_2.fq"
---
>         read1 = "tests/integration/toy_reads/{sample}_1.fq",
>         read2 = "tests/integration/toy_reads/{sample}_2.fq"
32,33c32,33
<         read1s = ["cutadapt/{condition}_1_1.fq", "cutadapt/{condition}_2_1.fq", "cutadapt/{condition}_3_1.fq"],
<         read2s = ["cutadapt/{condition}_1_2.fq", "cutadapt/{condition}_2_2.fq", "cutadapt/{condition}_3_2.fq"],
---
>         read1s = ["cutadapt/{condition}_1_1.fq", "cutadapt/{condition}_2_1.fq"],
>         read2s = ["cutadapt/{condition}_1_2.fq", "cutadapt/{condition}_2_2.fq"],
Here is a potential version of yeast_config.yaml. There
are other things we could configure, like the list of kmer lengths, but
this is the minimum to support being able to use the same Snakefile for
both the toy and original data.
conditions: ["ref", "etoh60", "temp33"]
reads_dir: "reads"
replicates: ["1", "2", "3"]
Challenge
- Make a config file for the toy data
- Modify the code to use the settings in the config file
- Modify the
run.shfile and ensure the test still passes
Hint: to vary the number of replicates in the concatenate
rule, you can use an expand() expression, but you will need
to put extra brackets around {{condition}} to avoid getting
a WildcardError.
This is an equivalent config file, which could go under
tests/integration/toy_config.yaml:
conditions: ["toy"]
reads_dir: "tests/integration/toy_reads"
replicates: ["1", "2"]
In the Snakefile, at the top:
CONDITIONS = config["conditions"]In the cutadapt rule, there are other ways to write this but this is probably the simplest:
input:
    read1 = config["reads_dir"] + "/{sample}_1.fq",
    read2 = config["reads_dir"] + "/{sample}_2.fq",
In the concatenate rule, we need to change not only the
input patterns but the number of inputs based upon the configured
replicates. Again, there are different ways to do this but this will
work. The {rep} gets replaced with replicate numbers by the
expand() function but then the {{condition}}
keyword remains as {condition} so it still acts as a
wildcard.
input:
    read1s = expand("cutadapt/{{condition}}_{rep}_1.fq", rep=config["replicates"]),
    read2s = expand("cutadapt/{{condition}}_{rep}_2.fq", rep=config["replicates"]),
In the tests/integration/run.sh script we just need an
extra --configfile parameter when calling snakemake.
snakemake -F --use-conda -j1 --configfile tests/integration/toy_config.yamlIf you have not done so already, move the
toy_config.yaml file to the tests/integration directory and
run the run.sh script to reassure yourself the test still
works.
What if the different conditions have a different number of replicates?
This situation can be handled. The configuration could look like this.
reads_dir: "reads"
conditions:
    ref:
      replicates: ["1", "2", "3"]
    etoh60:
      replicates: ["1", "2"]
    temp33:
      replicates: ["2", "3"]
The input for the concatenate rule now gets a bit more complex.
input:
    read1s = lambda wc: expand( "cutadapt/{condition}_{rep}_1.fq",
                                condition=wc.condition,
                                rep=config["conditions"][wc.condition]["replicates"]),
    read2s = lambda wc: expand( "cutadapt/{condition}_{rep}_2.fq",
                                condition=wc.condition,
                                rep=config["conditions"][wc.condition]["replicates"]),
To understand this, you need to read about input
functions in the Snakemake docs. Using input functions allows you to
go beyond the basic wildcard replacement logic for rule inputs. The
lambda: keyword in Python defines an anonymous
function.
Content from Using standard file locations
Last updated on 2025-03-13 | Edit this page
Overview
Questions
- What tools exist to check that the workflow files are all present and correct?
Objectives
- Understand the Snakemake recommended file layout
- Reorganise our sample code to comply with this standard
- Run the snakemake lint checker over the code
Moving files to appropriate locations
There is a recommended layout for files in a Snakemake workflow. Following this convention will help other users to understand and use your workflow when you share it.
The following listing is taken from the Snakemake reference documenation
├── .gitignore
├── README.md
├── LICENSE.md
├── CODE_OF_CONDUCT.md
├── CONTRIBUTING.md
├── .tests
│   ├── integration
│   └── unit
├── images
│   └── rulegraph.svg
├── workflow
│   ├── rules
│   │   ├── module1.smk
│   │   └── module2.smk
│   ├── envs
│   │   ├── tool1.yaml
│   │   └── tool2.yaml
│   ├── scripts
│   │   ├── script1.py
│   │   └── script2.R
│   ├── notebooks
│   │   ├── notebook1.py.ipynb
│   │   └── notebook2.r.ipynb
│   ├── report
│   │   ├── plot1.rst
│   │   └── plot2.rst
│   ├── Snakefile
│   └── documentation.md
├── config
│   ├── config.yaml
│   └── some-sheet.tsv
├── results
└── resources
What should we change in the light of this?
- The
.gitignorefile is related to using Git, which we will come to in the next chapter. - The
README.mdshould be a text file briefly describing the workflow. We’ll add this now. - We’ll need a license before we share the code, but we’ll consider this later.
- We’ll skip the
CODE_OF_CONDUCT.mdandCONTRIBUTING.mdfiles for now. - We have a
testsdirectory, but the official layout says it should be.tests - We’ll generate a rulegraph using the
--dagoption of Snakemake - We’ll move our
Snakefileand conda environment file as suggested - We’ll leave all our rules in the main Snakefile for now, but notice that we have the option to break out rules or groups of rules into modules.
- We have no scripts, notebooks, reports or resources in our simple workflow just now.
- We should put our
yeast_config.yamlinto aconfigsubdirectory. - The Snakemake workflow should put output files into a
resultssubdirectory.
We’ll tidy our code to comply with the above points, and then keep to using standard file locations from now on. Let’s do the simpler stuff first.
Making a rulegraph.svg
This is just a picture of our workflow DAG. Remember that in Snakemake the DAG is always constructed with reference to a specific target. We could make the rulegraph based on the yeast transcriptome data or the toy data. We’ll use the toy dataset.
This file made by Snakemake is in GraphViz formay, not
SVG format, but we can use the dot command line
tool to convert to SVG.
SVG is the Scalable Vector Graphics format. If you want to view the SVG directly you can try loading it in a web browser.
Moving the files around
Some files just need to move to a standard location. First, we’ll make the required subdirectories.
Now move the existing files
Renaming the tests directory
The official layout guidance says that that tests should be in a
directory called .tests which would be a hidden directory.
If we don’t want to test files to be hidden, a compromise is to rename
the directory, but then make a symlink to keep it visible in our file
listings.
Adding a README.md
The idea of this README is to provide a top-level summary and introduction to your workflow. Some people will just add a brief description, while others will add comprehensive documentation in this file. We’ll just add a brief description.
The .md/Markdown format, is an enhanced
text format that supports all sorts of formatting, but for now we
just need to know that lines beginning # will be shown as
headings.
Create the file README.md in the text editor, and paste
in the following text.
MARKDOWN
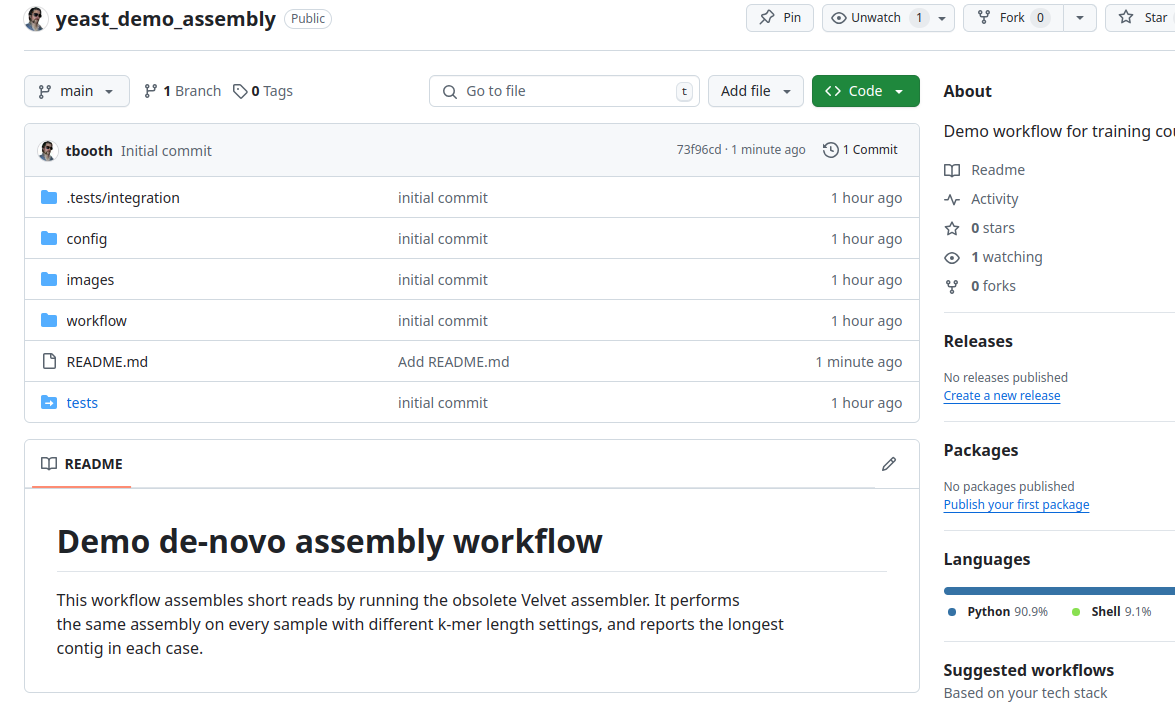
# Demo de-novo assembly workflow

This workflow assembles short reads by running the obsolete Velvet assembler. It performs
the same assembly on every sample with different k-mer length settings, and reports the longest
contig in each case.
Saving output to a results directory
All of our output files currently go into subdirectories within the
current working directiory, but the standard says they need to be under
results. On the face of it, it seems that we need to modify
all of our rules and add results/ to the start of the
paths. Fortunately there is a trick to avoid this.
READS_DIR = os.path.abspath(config["reads_dir"])
workdir:
    config.get("results", "results")
Then in the cutadapt rule, modify the input part to
reference the READS_DIR variable.
input:
    read1 = READS_DIR + "/{sample}_1.fq",
    read2 = READS_DIR + "/{sample}_2.fq",
The use of os.path.abspath(config["reads_dir"]) will
convert the reads_dir to an absolute path, so it will work
regardless of what we use for the workdir.
The workdir will now default to results, as per
the standard layout, but we can override it in the configuration.
Challenge
Edit the toy_config.yaml file so that the results for
test runs go into a directory named test_results. See if
the workflow is still working after all these changes. What do we still
need to fix?
Add this line to the file
tests/integration/toy_config.yaml
results: "test_results"After this, we can try the test script.
At this point you are liable to see an error about a missing file for
assembly_conda_env.yaml. In the Snakefile, the path for all
conda: environments needs to have envs/ added
since we have moved the file.
Also, you need to change the line in the
tests/integration/run.sh script so that it checks the
correct file after running Snakemake.
It should check the file in the test_results/
subdirectory:
If you didn’t spot this, it’s likely because you still have the old
file under ./assem/ and the test script is picking this up
and printing PASS at the end.
Linting the code
Now is a good time to run the --lint option of
Snakemake.
“Linting” a program is defined by Wikipedia as running a “tool used to flag programming errors, bugs, stylistic errors and suspicious constructs”.
In this case, Snakemake points out a few things:
- Specify a conda environment for the concatenate rule
- Absolute path and Path composition warnings regarding the data file locations
- No log directive defined for all the rules with a shell part
The first of these is unreasonable. We don’t need a special conda
environment to run the cat command! But for most rules that
run shell commands, you should indeed be defining a conda
environment or a container to use.
The second is also unreasonable. Reading input files and reference
files from outside of the current directory is fine, and in fact
necessary here when using workdir: "results". However, you
should avoid ever getting Snakemake to write files outside of
the working directory. Snakemake will do it, but it is problematic.
The third point is very reasonable. Command output should be logged to a file, not just printed on the screen. A trick that works in most cases to do this easily is to add this line at the start of each piece of shell code.
Assuming you have defined a log filename for the rule (you
should make these under a logs/ subdirectory), this will
send anything that would have been printed to the terminal into that
file. You do not need to modify the existing shell
commands.
Challenge
Add log outputs for the rules. You can skip doing this for the concatenate rule.
Content from Source code control
Last updated on 2025-03-28 | Edit this page
Overview
Questions
- What are the key ideas of source control?
- What are the essential GIT commands we need to manage our simple code?
- How can git tags help to manage our code updates?
Objectives
- Put our code under version control with GIT
- Record our changes and edits in the GIT commit history
- Push our code to GitHub
Source code control with Git
Covering anything but the bare basics of Git here is not possible, but we need to know a few fundamentals:
- Git is a program that takes snapshots of all the files in a directory, and remembers every snapshot taken.
- These snapshots are known as commits, and a sequence of commits logged over time is known as a branch. In the simple case, we have a linear series of commits over time, so just one branch.
- You decide when to make a commit, providing a comment to summarize what you changed.
- Git can then show you a history of your commits, or show you exactly what changed (a diff) between two version.
All this happens on your local system, by saving special files into a
.git subdirectory, but you have the option to push
that information to a remote repository. The most popular such
service, and the one we will use today, is GitHub.
- GitHub is a free-to-use service owned by Microsoft.
- It allows anyone to view your code on-line, and pull it to another computer.
Git + GitHub
We’ll now commit our code to Git and push it to GitHub. You are going to need a GitHub account for this, so if you did not create one before the course do so now.
The figure below shows how the components connect. We’ll commit the code locally, then push to GitHub, then view the code in a browser.

Making the initial local Git commit
First, set some settings for Git. These will be saved into a file
.gitconfig in your home directory, and so will apply any
time you use Git within this account on this computer.
Note that the first two options require using a Git version
>= 2.37.0. Older versions will accept the config command
but it will have no effect.
BASH
$ git config --global init.defaultBranch main
$ git config --global push.autoSetupRemote true
$ git config --global user.email "you@example.com"
$ git config --global user.name "Your Name"
Now, tell Git that the directory containing your workflow is to be
treated as a Git local repository. This creates a new directory named
.git/ where all commits will be saved.
Make sure you run this in the directory where you have your
workflow, README.md, .tests,
etc.
And now make the first commit. This is a two step process, as we first select what files to save and then commit them with a message. We do not want to commit all the files, just a specific selection. In particular, avoid adding large data files into a Git snapshot.
The second command will bring up a text editor, probably nano unless you configured something else. You will see something like this:
# Please enter the commit message for your changes. Lines starting
# with '#' will be ignored, and an empty message aborts the commit.
#
# On branch main
#
# Initial commit
#
# Changes to be committed:
#       new file:   .tests/integration/run.sh
#       new file:   .tests/integration/toy_config.yaml
#       new file:   .tests/integration/toy_reads/toy_1_1.fq
#       new file:   .tests/integration/toy_reads/toy_1_2.fq
#       new file:   .tests/integration/toy_reads/toy_2_1.fq
#       new file:   .tests/integration/toy_reads/toy_2_2.fq
#       new file:   config/yeast_config.yaml
#       new file:   images/rulegraph.svg
#       new file:   tests
#       new file:   workflow/Snakefile
#       new file:   workflow/envs/assembly_conda_env.yaml
#
# Untracked files:
#       .snakemake/
#       Snakefile2
#       concatenate/
#       cutadapt/
#       first5.fa
As the message says, you are invited to enter a commit message. In this case it’s reasonable to just type something like:
initial commitThe lines starting with ‘#’ just serve to remind you what you are
committing. If you see these lines and decide you don’t want to commit
after all, you can exit the editor without saving to abort the commit.
Back at the command line you may add more files with
git add ..., or you may start the selection again with
git reset.
Once you are happy, type your commit message at the top of the file
and save it. If you are in the nano editor,
Ctrl+X, then y, then [Enter] will
do this and get you back to the terminal. You should see:
OUTPUT
[main (root-commit) de0037f] initial commit
 11 files changed, 2167 insertions(+)
 create mode 100755 .tests/integration/run.sh
 create mode 100644 .tests/integration/toy_config.yaml
 create mode 100644 .tests/integration/toy_reads/toy_1_1.fq
 create mode 100644 .tests/integration/toy_reads/toy_1_2.fq
 create mode 100644 .tests/integration/toy_reads/toy_2_1.fq
 create mode 100644 .tests/integration/toy_reads/toy_2_2.fq
 create mode 100644 config/yeast_config.yaml
 create mode 100644 images/rulegraph.svg
 create mode 120000 tests
 create mode 100644 workflow/Snakefile
 create mode 100644 workflow/envs/assembly_conda_env.yaml
Pushing to GitHub
Sending new code to GitHub is normally a matter of running one command.
If you run this just now, you will see an error.
OUTPUT
fatal: No configured push destination.
Either specify the URL from the command-line or configure a remote repository using

    git remote add <name> <url>

and then push using the remote name

    git push <name>
Before we configure the remote repository, we have to add a SSH key credential to GitHub. This is a secure way to tell GitHub that we do have permission to push code from this login account.
$ cat ~/.ssh/id_rsa.pubIf this shows a long line of characters then you already have a key and can use that. If not, you need to create one.
$ ssh-keygen -t rsaPress enter three times to accept the default options, and now you
should have a ~/.ssh/id_rsa.pub file. This goes into GitHub
under your SSH and GPG
keys page which is under the account settings area.
- Select Add new SSH Key
- For the title, use the format
user@hostnamefor where you made the key, eg.training@vm-07 - Set the type as Authentication Key
- Paste the whole contents of your
~/.ssh/id_rsa.pubfile into the big box
Now we make a repository for our code. This also needs to be done on the web interface.
- Use the New Repository option from the GitHub main page.
- Give the name yeast_demo_assembly
- Give a description like Demo workflow for training course
- Ensure this repository is Public
- Do not add any further items, just click Create repository
And after this you should see instructions to “push an existing
repository from the command line”. This is exactly what we need to do,
but the instructions shown by GitHub (at the time of writing) do not
account for us having the push.autoSetupRemote setting.
Therefore use the commands below, but remembering to fill in your own
GitHub username.
And we are done. The code is public in GitHub. In the web browser, navigate to the new repository and view your files.
GitHub dangers
Many people worry about sharing their un-finished code in a public repository, or relying on the GitHub service. In practise, there is not much to fear, but there is one significant risk:
Avoid leaking passwords, authentication tokens, and private data into Git. If you ever add such an item to a commit then removing it from the Git history is nearly impossible. Git is designed to never forget! Having good habits about separating your code, configuration and data is the best way to avoid this. For example, if your workflow needs to retrieve data from a server with a user name and password, either pre-fetch the data or, if you must automate acess, then at least put the password into a configuration file outside of the workflow source directory.
You may also worry that data on GitHub might be corrupted or lost, but this is less of a worry. The chain of commits on Git is cryptographically signed, so it’s unlikely that code can ever be tampered with. Also, moving code to another Git hosting service, along with the full commit history, is very easy. If you start out using GitHub you can move to an alternative host at any time.
Finally, having your code up on a public repository does allow others to copy from it, but if anyone tries to pass off your the code as their own you have very strong evidence of ownership.
Content from Adding a license
Last updated on 2025-03-21 | Edit this page
Overview
Questions
- What OSI licenses are available?
- How do I record ownership and authorship of my code?
Objectives
- Understand the difference between license and copyright
- Understand what might inform, or limit, our choice of license
- Add a license to our own code
The short answer: add the MIT license
The MIT license is a simple permissive license that…
- asserts your right to be identified as the creator/owner of the code
- permits others to re-use, modify and share it
- disclaims any liability for bugs or errors in the code
The GitHub web interface has an option to add the license file, but we’ll just do it manually.
In your workflow source directory, download the MIT license text template and add your own name at the top, along with the date.
BASH
$ wget https://raw.githubusercontent.com/licenses/license-templates/refs/heads/master/templates/mit.txt
$ mv mit.txt LICENSE.txt
$ nano LICENSE.txt
You may now commit and push the change to GitHub.
The -m option to git commit allows you to set
a short commit message without going through the text editor. We’ll use
this in the examples from now on as it is easier to write things out
this way in the code snippets.
Licence, copyright, and other stipulations
Copyright ownership
License and copyright are two different things. Copyright means identifying the legal owner of the code and related files. Often this is obvious, but you need to get it right.
- If you wrote the code as part of your paid work, your employer is generally the owner.
- Code written in your own time, outside of work projects, belongs to you.
- Copyright ownership can be assigned to another owner by formal agreement.
- Ownership can be disclaimed entirely, but this is generally a bad idea as noted below.
- If you incorporated pieces of code from other work, the owners of that work share ownership.
- Code that you produce with AI tools is not owned by you (but to some degree this is an open legal question).
Questions of ownership have led to costly and acrimonious legal actions, including ones between academic institutions and between employees and employers. Where the ownership of code is not specified, many organisations and projects will simply refuse to touch it, so even if you do not intend to restrict the copying of your code, you need to explicitly identify who had the right to make that stipulation.
Copyright on the sample workflow
Given the above, putting your own name on the
LICENSE.txt file in your Git repository is looking
problematic, since the Snakefile was created by the authors of this
course. However, the terms of use for the
course material explicitly say that you can do that.
Licensing the code
Having identified the owner of the code, you need to say what others may legally do with it. In the case of software products that you plan to sell or otherwise monetize you would want to make careful and explicit restrictions, but in this context we assume that you want your workflow to be shared and re-used by whoever may need it. There are many OSI Approved Licenses but most are for niche applications, or concerned with source code versus compiled code, or concerned with patents. These probably do not apply to your workflow. As stated above, you should use the MIT license unless you have a good reason not to.
If you have incorporated any code that was shared with you under a different license then that license may stipulate (the GPL is a notable example) that your new derived work must use that same license. However, this does not apply to tools that are called by your workflow, only code you are directly copying into your workflow.
If you are distributing tutorials, presentations or other substantial documentation along with the code then you likely want to consider a separate license for these. The OSI Licenses are all geared to the sharing of code, whereas the Creative Commons licenses are designed for other creative works. The equivalent of the MIT license here is the least restrictive CC-BY, which is used for these lessons and all the Carpentries materials, but you may prefer to opt for an alternative.
Other stipulations
You would probably like your workflow to be cited by anyone who uses it for their research. You may like the idea that users should send you a postcard. Maybe you are concerned that your workflow should not be used for nefarious purposes, like developing bio-weapons. In the past, extra stipulations like this were added to many licenses and it causes a big headache, less for the end users but more for the projects and sites that archive and redistribute code. For this reason, we give you this edict:
Choose an established Open Source license, and do not edit the legal text in the LICENSE file
Having said this, you can add any further requests that you like. Just do not give them legal weight unless you or your employer would be prepared to take legal action over them. You could ask your users to send you a postcard. You may vent your anger at those who use science for the disbenefit of humanity, though they are unlikely to care.
We’ll assume here that, like most researchers, you would like your work to be cited.
Requesting a citation
While it may not be a legal requirement, the expectation of citation is enforced by academic publishers and the norms of the scientific community. Different publications use different citation formats, and there are also several open citation formats. Fortunately in this case there is one best way, using CFF. This standard is promoted by GitHub, but it’s widely supported and can be auto-converted to whatever is actually needed.
Save the following text to a file CITATION.cff. You can
edit the text if you like (the underlying format is YAML, as used for
the workflow configuration files), but the official
on-line CFF editor provides a better way to create and amend these
files.
# This CITATION.cff file was generated with cffinit.
# Visit https://bit.ly/cffinit to generate yours today!

cff-version: 1.2.0
title: Demo assembly workflow
message: >-
  If you use this software, please cite it using the
  metadata from this file.
type: software
authors:
  - given-names: Timothy
    family-names: Booth
    affiliation: University of Edinburgh
  - name: BioFAIR
    website: 'https://biofair.uk'
url: 'https://tbooth.github.io/snakemake-publishing'
license: MIT
Note there is some redundancy with LICENSE.txt, in that
the license name and the authors are specified, but the authors for the
purpose of citation are not necessarily the legal copyright owners of
the code. Also, the LICENSE.txt statement is generally
understood to hold legal weight while this CITATION.cff
file is informative and may be updated as needed. If you publish the
workflow in a journal, or mint a new DOI for it, then add the info
here.
Add the new CITATION.cff file to Git.
Content from Upload to WorkflowHub
Last updated on 2025-03-28 | Edit this page
Overview
Questions
- Why should I use WorkflowHub?
- How does WorkflowHub compare with the Snakemake Workflow Catalogue?
Objectives
- Create an account on the WorkflowHub dev server
- Submit our workflow to the system via the web interface
- Add tags and documentation to our workflow
- Review how our workflow will appear on the website
About WorkflowHub.eu
WorkflowHub is a FAIR registry for describing, sharing and publishing scientific computational workflows. The registry is sponsored by multiple EU-wide projects, notably the European RI Cluster EOSC-Life, and the European Research Infrastructure ELIXIR.
While the project is EU-funded, and serves the needs of EU research projects, all users are welcome. You do not have to be in Europe, or part of any European project team, to make use of it.
From their own guide, these are the reasons why any research project (or team, or facility) producing workflows should register them in WorkflowHub:
- To give visibility to the workflows used by a project
- To share workflows across a project, within project networks and externally
- To credit and cite the people making workflows, and the networks to which they belong
- To track the new versions of workflows as they are produced, and
- To retain workflows for post-project use by a project’s members, their networks, and the broader scientific community
As an individual user, the ability to search for workflows directly on the site or to obtain a workflow cited in a paper can be immediately useful. For the purposes of this workshop we will submit our own sample workflow to show how that side of things works. We’ll submit to the development version of the site, so as not to fill up the main website with test workflows.
Registering on the WorkflowHub test server
You will need an account on the dev server to upload your workflow. Even if you previously registered on WorkflowHub, make a new account on the development server as the accounts are completely separate.
- Visit https://dev.workflowhub.eu
- Click the Log in button (not the Register button)
- Log in with GitHub to create a new account
- On the next screen, enter your name but leave the other details blank
- Verify your account using the e-mail token
If for some reason you are unable to use your GitHub login then it is possible to register a standalone account with your e-mail address. You will need to verify your e-mail before the account can be active.
If for any reason some people are unable to create an account, learners may log into the account owned by the course tutor. Since this is a test server, this is OK.
Joining a team
In order to use the website, you must be a member of at least one team. One option would be to make a personal team. We’ll not do this today as it requires an administrator approval from the WorkflowHub maintainers and we don’t want to burden them with requests or have to wait for all the approvals. Instead, all learners can join a team owned by the course tutor. This team name is “Submission Tutorial”.
- Click on the “Join a Team” option you see after successfully logging in.
- Find the team as named above and request access.
- Choose any existing organisation you like, be it your real organisation or not.
- You can fill in the other things or leave them blank.
- The tutor will approve all the requests via their own account.
Submitting our test workflow
Once you are enrolled in the team, you may Contribute your workflow.
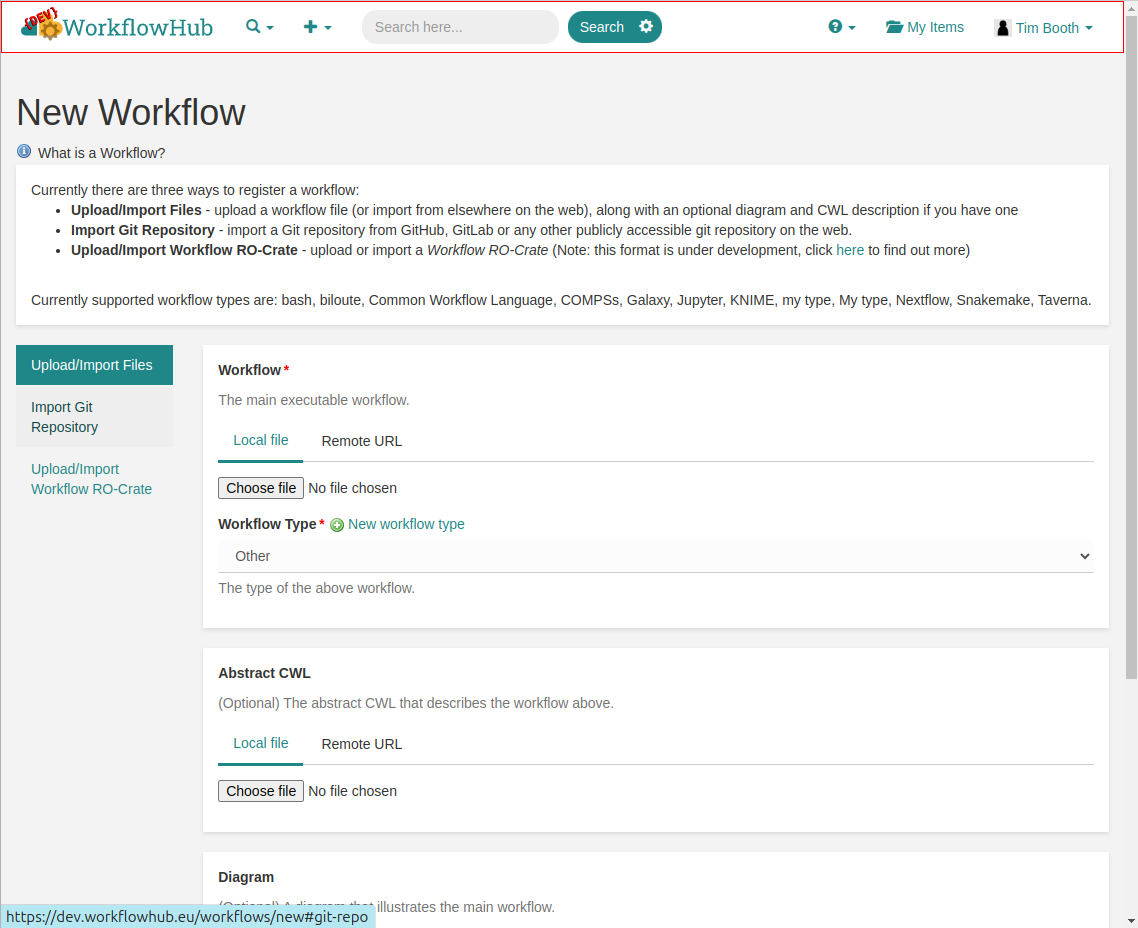
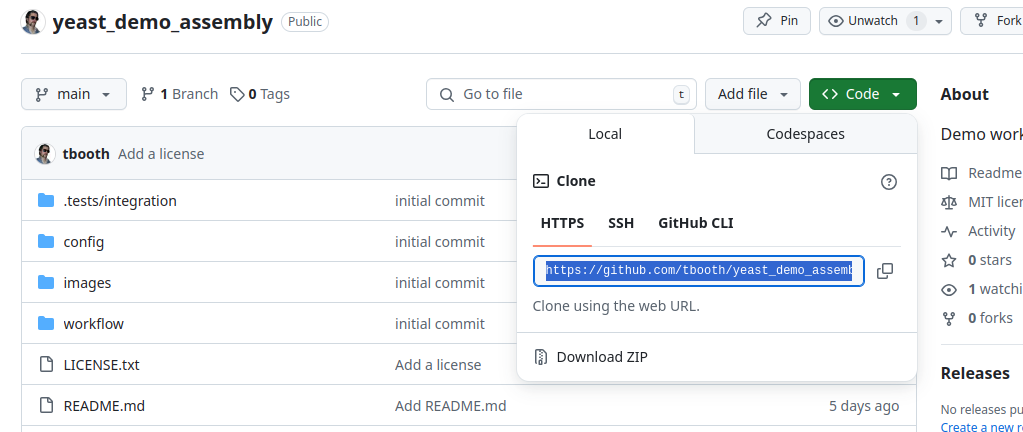
As we have now stored our workflow in GitHub, and the file layout matches the recommendations, the easiest option is to use the Import Git Repository method, rather than uploading the files directly from the local machine.
You will be prompted for the “URL of the git repository”. For
repositories on GitHub this is simply the regular URL you would use in
your browser, with “.git” on the end. You can also find this by clicking
the “Code” button on the project page within GitHub. It will start with
https://....
Once you enter the URL and press Register, you should see an option to import the main branch, so go ahead.
Now you need to confirm that your main workflow is
workflow/Snakefile and is of type Snakemake. Also
the diagram is under images/rulegraph.svg.
Ignore the Abstract CWL - we do not have this.
On the next screen, you will see that the README.md has
been loaded into the Description box. You can move the
header text from here into the Title box above.
Ensure the workflow is associated with the Submission Tutorial team.
You should see that the License is correctly detected as
MIT License, and you should also see that information from your
CITATION.cff file has been picked up.
You could add extra items at this point but we have all we need for the initial upload. Click the Register button one more time, and confirm you are happy with public visibility. You should now see your workflow on the site. You can bookmark the URL for your workflow and share it directly, or you could mint a DOI for the workflow if you plan to publish this version.
Note: DOI creation may not work correctly on the dev.workflowhub.eu site.
The Snakemake Workflow Catalogue
This site, made by the Snakemake developers, can be found at:
https://snakemake.github.io/snakemake-workflow-catalog/
This is another resource where you may find and share Snakemake workflows. It works very differently to WorkflowHub, in that.
- This resource is specific to Snakemake workflows
- Workflows are not submitted directly to the catalog, but are discovered and listed from GitHub
- All the listed workflows are public, as they must be public projects on GitHub to begin with
- There is no option to upload a workflow diagram or any extra documentation files
- There is no option to mint a DOI for publication
- You can add extra information to the catalog by adding a
.snakemake-workflow-catalog.ymlfile in your Git repository - You automatically update your workflow by making releases on GitHub
There is no reason why your workflow should not be in both places.
Content from RO-Crates
Last updated on 2025-03-21 | Edit this page
Overview
Questions
- What are RO-crates in general?
- What are the specific types of RO-Crate?
- What can I do with an RO-Crate?
Objectives
- Download the RO-crate for our workflow
- Understand the structure of an RO-Crate
- Put the metadata file into Git
A general introduction to RO-Crates
An RO-Crate is simply a zip file that contains a collection of data files, and includes a structured description of what those files are.
The base RO-Crate specification says that you can include any types
of data files you like, but it does stipulate that the description must
be in a file named ro-crate-metadata.json and that the
format of this file is JSON LD.
We will not talk about the details of the JSON LD format, since it’s pretty technical and also because WorkflowHub is going to make the file for us. But we do need to understand that it contains:
- Information about the data collection as a whole
- who created it
- who may use it (the license)
- A description of what each of the individual data files are
- the formats of the files
- the content of the files
- how the specific files relate to each other
The JSON LD file is not designed to be read directly by end users. Rather, software like that running on WorkflowHub will read and summarise the file. User-readable documentation is best written in a format such as Markdown, and from the RO-Crate perspective, is regarded as part of the dataset.
Putting workflows into RO-Crates
The RO-Crate standard was not specifically designed for sharing workflows, but the base standard has been extended by several profiles.
The most comprehensive of the profiles is the Provenance Run Crate. The goal of this standard is to cater for users who want to share their workflow outputs, but desire to very carefully record exactly how they obtained those output files, including all the input data, software versions, parameters, platform and procedure (workflow) used. Imagine for example a forensics laboratory where the whole analysis process could be audited and questioned, even several years after the analysis. Work is ongoing to add reporting plugins to Snakemake that provide for automated recording at this level of detail in a single archive.
The Workflow Run Crate is a less stringent version, recording that a particular analysis was made with a particular workflow, and the results of that analysis.
The Workflow Testing RO-Crate would be suitable to capture information about our toy dataset and any other tests included with the workflow. (But we’ll not look further into this topic within this course).
Here, will will just look at the basic Workflow RO-Crate. As suggested in the WorkflowHub docs:
The most convenient way to make a workflow RO-crate at this moment is by making use of WorkflowHub capabilities.
Getting the RO-Crate matadata from WorkflowHub
So we will download our workflow as an RO-Crate from
WorkflowHub. Use the Download RO-Crate button on the website.
Assuming you save the resulting .crate.zip file in your
Downloads directory, you can look at the contents on the
command line, or you can open the file in GUI.
BASH
$ ls ~/Downloads/*.crate.zip
...see the actual filename...
$ unzip -tv ~/Downloads/workflow-XXXX.crate.zip
Aside from the files we made ourselves, we see:
OUTPUT
    testing: ro-crate-metadata.json   OK
    testing: ro-crate-preview.html    OK
The HTML file is just a visual preview of the JSON file. We extract the JSON file into our source directory.
And commit it back to GIT.
Now you have a backup of all the information that WorkflowHub stores about the workflow, saved along with your code. You can also use this file to automate submission of new versions of the workflow to WorkflowHub, as outlined in the next episode.
Content from Releasing a new version
Last updated on 2025-03-21 | Edit this page
Overview
Questions
- What should I do to update the workflow?
Objectives
- Understand sematic versioning
- Push a new workflow version to Workflowhub and GitHub
- Automate new releases
New versions of the workflow
It may well be that your workflow is used for one study, archived on WorkflowHub, and never changed again. On the other had, you may use the workflow on some new data and find that you need to add new features or options. Or maybe someone alse uses your workflow and writes to suggest a bug fix or enhancement that you are happy to incorporate.
Releasing a new version is essentially the same process as submitting the workflow in the first place:
- Make and test the code changes
- Commit the changes in Git
- Push to GitHub
- Register a new update on WorkflowHub.com
Having said this, there are some considerations that will help you and others to understand the nature of the update.
Sematic versioning
Semantic versioning is the established way to assign a version number to any piece of software. You should use this scheme when releasing any updates to your workflow. A sematic version looks like this:
v1.12.3
The v is not part of the version, but is normally
included to indicate what the numbers are referring to.
Then 1 is called the major version, 12 is
the minor version, and 3 is the patch version. The choice
of version number indicates to the user not only which release is the
latest but also how two releases relate to each other.
Guidance for sematic versioning tends to focus on the task of writing software libraries for which there is a “public API”. Workflows are a little different but analogous guidelines can still be followed.
Incrementing the patch version
This is for bug fixes and documentation changes only. If you add any new features or options you should increment the minor version.
Changing to a new patch version should not affect the output of the workflow at all, other than in the case of fixing something which is clearly broken. The versions of any software tools used by the workflow should not change, other than to switch up to a new patch version of a tool which addresses some bug.
In many cases there will be no need for a patch version, and so this number is normally 0 for most pipeline releases.
Incrementing the minor version
In the most common case, if you release an update to your workflow you will increment the minor version. You can add new features, re-write parts of the process, and bring in new software. In general it should be possible to re-do any previous analysis with the updated workflow, but it is not necessary that you obtain an identical result, as changes to tool versions or default parameters may affect that.
In our sample workflow, adding the ability to configure the adapter used by cutadapt, for example, would warrant a new minor version.
Incrementing the major version
The decision over whether to make a major or minor release is more subjective. For some software (the bowtie and bwa read aligners are cases in point) the new major release is a whole re-write such that the new version is more like a whole new program. It’s reasonable to say that making a major release is on the same level of significance as giving the software or pipeline a new name.
A change in major version indicates to any users that they cannot assume the workflow will operate as before, and they should re-read the documentation before using it. Most workflows will never get a change so fundamental that a major version increment is necessary.
If we changed the assembler in our workflow from Velvet to something more modern this would warrant a major new major version.
Pre-releases
If you consider your workflow to be a work in progress but still wish to track the version number you may version it as “0.1.0”. The major version number of 0 indicates a development pre-release. If you update the code you should increment the minor or patch releases as above, but the distinction between these is understood to be less meaningful in the context of development releases.
Variants on sematic versioning
For some well-known software, you will see the versions like
24.12.0 - a variation where major and minor version numbers
encode the year and month of release. The patch number is still just a
sequential number. This works will in projects like Ubuntu Linux which
have periodic releases, but in the case of workflows or other software
you write you are best to avoid it.
You will see that in WorkflowHub, since we did not specify a version, the versions look like this:
main @ 08522a2
That hexadecimal number comes from the start of the Git commit
identifier (as seen in the git log command) and serves as a
unique identifier, but it say nothing about the ordering and
relationship between workflow versions.
Updating our workflow
Let’s make a small change to the workflow, allowing the user to set the adapter sequence for cutadapt in the config file.
In the cutadapt rule, change this part of the cutadapt rule.
    params:
        adapter = "AGATCGGAAGAGC"
to
    params:
        adapter = config.get(adapter, "AGATCGGAAGAGC")
And commit to Git:
BASH
$ git add workflow/Snakefile
$ git commit -m 'Allow the adapter to be configured for Cutadapt'
$ git push
As noted above, this warrants an increase in the minor release version. As we didn’t actually set the version in the initial upload we’ll say that the initial upload was 1.0.0 and this new one will be 1.1.0.
You can change the version for the workflow that’s already in
WorkflowHub, so do this now. Use the Edit button in the
Version History section at the bottom of your workflow page,
and change the version to v1.0.0 (including the v
here is a good idea as we’ll see shortly).
Making a versioned GitHub release
We’ll make the release on the GitHub web interface. There are other ways to do it, but this is the simplest.
- On github.com, when viewing the yeast_demo_assembly repository, make sure the latest commit is showing up as the change you just pushed.
- Click the Create a new release link on the right.
- In the Choose a tag dropdown, enter the new tag v1.1.0 and click the option that appears to Create new tag: v1.1.0 on publish.
- You may enter a release title and description or hit Generate release notes to auto-fill these options.
- Now Publish release
Back on dev.workflowhub.eu, we can tell the site about the new release.
- Use the Actions > New Version option on the web interface
- Confirm that we are fetching from the existing repository
- This time, select the v1.1.0 option from the Tags target
- Accept all the changes and Register the new version.
Automated update from GitHub to WorkflowHub
It’s overkill for most workflows, but if you want to be able to add new versions to WorkflowHub without the chore of going to the site and manually importing then this is possible.
Instructions on the following page outline how to set up an automated submission action:
https://github.com/workflowhub-eu/submission-action
We already have a WorkflowHub account and a WorkflowHub team. We do need an API token. Get this from the dev.workflowhub.eu website under Top-Right Menu > My Profile > Actions > API Tokens > New API Token. Give the title github_release and Create. Then leave the next page open so you can copy the token.
Back on github.com, make sure you are viewing the yeast_demo_assembly project and click the Settings button in the top bar. On the left, select Secrets and variables and then select Actions from the sub-options. Then click the button for New repository secret.
Give the name as DEV_WORKFLOWHUB_API_TOKEN (you must use this exact name) and paste in the token that is shown in dev.workflowhub.eu. Then click Add secret.
Now you need to make sure there are two files in your repository. One
is the ro-crate-metadata.json obtained in the previous
episode. You can edit this directly if you want to change the
information about your workflow when you make a new release. The other
is a file named
.github/workflows/submit_to_workflowhub.yml. It must
contain a version of the text found at the
bottom of the instructions page.
name: Workflow publishing on dev.WorkflowHub.eu

on:
  release:
    types: [published]

jobs:
  wfh-submit:
    name: dev.WorkflowHub.eu submission
    runs-on: ubuntu-latest
    steps:
      - uses: actions/checkout@v4
      - name: Submit workflows
        uses: workflowhub-eu/submission-action@v0
        env:
          API_TOKEN: ${{ secrets.DEV_WORKFLOWHUB_API_TOKEN }}
        with:
          team_id: 58
          instance: https://dev.workflowhub.eu
The team_id is 58 (which corresponds to the
Submission Tutorial team), and the submission happens only when
a release is published, not on every git push.
Add and commit the files as before.
$ git add ro-crate-metadata.json .github
$ git commit -m 'Enable auto-submit'
$ git push
And finally, make a new release on GitHub as above. Since the workflow has not changed, call this a patch release, and set the version tag to v1.1.1.
In GitHub, under the Actions tab, you should see the action triggered by the new release, and any errors with the submission.